Doing Multilingual or localizaiton in Laravel

লারাভেল মাল্টিলিঙ্গুয়াল ওয়েবসাইট করার প্রসেস টা বেশ সহজ

মাল্টিলিঙ্গুয়াল বা লোকালাইজেশন বলতে যেটা বোঝাচ্ছি তা হচ্ছে আপনার website এ আপনি চাইলে এমন ব্যাবস্থা করতে পারেন যাতে কোন ভিসিটর site এর ভাষা তার প্রয়োজন মত পরিবর্তন করতে পারে।

উদাহরন ঃ bikroy.com

এটা হতে পারে একটা Dropdown বা link এর মাধ্যমে । অনেকে তা subdomain দিয়েও করে থাকে

লারাভেল এ কিভাবে করা হয় তা একটু একটা ছোট প্রজেক্ট দিয়ে করার চেষ্টা করি

composer create-project –prefer-dist laravel/laravel multilang

আমাদের এই নতুন প্রজেক্ট টা হল multilang

আমাদের যে resources/views/welcome.blade ফাইল টা আছে আমরা  ওটাকে edit করে সামান্য কিছু লিখা দেই

<html>
    <head>
    </head>
    <body>
         <h1>Welcome</h1>
I would like to say something. It could be anything i need

</body> </html>

আমাদের কাজ হবে আমারা যখন localhost/multilang/public/en লিঙ্ক এ যাব তখন যেন English দেখায়

এবং localhost/multilang/public/bn এ গেলে যেন বাংলা দেখায়

Language Files

লারাভেল এর বিল্ট ইন কিছু Translation ফিচার আছে যেটা দিয়ে আমারা অনেক কিছু করে নিতে পারি ।

ওয়েব সাইট এ লাংগুয়েজ সাধারনন্ত কিছু lang ফাইল এর মধ্যে লিখে রাখা হয়। প্রতিটি ভাষার জন্য আলাদা আলাদা lang file অথবা folder রেখে দিতে হয়। লারাভেল এ এই ফাইল গুলো থাকে – resources/lang/* এর ভেতর। এখানে উল্লেখ্য লারাভেল ২ রকমের language ফাইল সাপোর্ট করে।

১) Raw PHP array – এই ফাইল গুলো দেখতে এমন

<?php
return [
   'greet' => 'স্বাগতম',
   'msg' => 'আমি এখানে কিছু বলতে চাই। আমার যা প্রয়োজন তাই',
   'link' => "এখানে ক্লিক করুন"
];

২) json array – এই ফাইল গুলে দেখতে এমন

{ 
     "Welcome": "স্বাগতম", 
     "I would like to say something. It could be anything i need": "আমি এখানে কিছু বলতে চাই। আমার যা প্রয়োজন তাই",
     "Click Here": "এখানে ক্লিক করুন"
}

দুই ভাবেই আপনি কাজ করতে পারেন তবে এই লিখাতে আমি json ব্যাবহার করবো। এর শুবিধা হচ্ছে আপনি খেয়াল করবেন json এর key এবং value দুটাই হচ্ছে আমাদের string টা। এতে মনে রাখার সুবিধা এবং কোন ট্রান্সলেসন যদি missing থাকে তাহলে সে অর্থহীন কোন key না দেখিয়ে তার English string টা দেখাবে

আমরা শুরুতেই ২ টা json file তৈরি করে ফেলি resources/lang এই ফোল্ডার এর মধ্যে ফাইল গুলো হলো

en.json and bn.json

আমাদের view file এ ফেরত যাই এবং লিখা গুলোকে রিপ্লেস করে @lang(”) ব্যাবহার করে লিখি

<html>
  <head>
  </head>
  <body>
    <h1>@lang('Welcome')</h1>
@lang(‘I would like to say something. It could be anything i need’)

<a href=”http://www.google.com”>@lang(‘Click Here’)</a>

</body>

</html>

এখন localhost/multilang/public এ গেলে আমরা আমাদের পুরনো লিখা গুলো দেখতে পারব কারন by default লারাভেল এ en সেট করা থাকে তাই আমরা এখন যদি লাঙ্গুয়ায়েজ query করি তাহলে English লিখা গুলো পাবো।

Cap2ture

আমরা জদি ভাষা পরিবর্তন করতে চাই তাহলে config/app.php এখানে

'locale' => 'en',

change করে

'locale' => 'bn',

এবার রিফ্রেশ দেই

Capture

Installing Mcamara Vendor

আমাদের site এখন ২ ভাষায় কাজ করতে পারে। এখন এই ল্যাংগুয়েজ লিঙ্ক এর ভিত্তিতে change করতে আমাদের একটা আলাদা vendor এর প্রয়োজন হবে ।

composer require mcamara/laravel-localization

এই ভেন্ডর টার github page documentation টা দেখে নিবেন

vendor install হয়ে গেলে config/app.php ফাইলে provider এবং alias ঠিক করে দিবেন

        'providers' => [
		// [...]
                Mcamara\LaravelLocalization\LaravelLocalizationServiceProvider::class,
        ],


        'aliases' => [
		// [...]
                'LaravelLocalization' => Mcamara\LaravelLocalization\Facades\LaravelLocalization::class,
        ],

এখন command line এ যেয়ে

php artisan vendor:publish --provider="Mcamara\LaravelLocalization\LaravelLocalizationServiceProvider"

এতে config folder এর মধ্যে laravellocalization নামে একটা ফাইল তৈরি হবে। অই ফাইল টা তে জেয়ে

//'bn' => ['name' => 'Bengali', 'script' => 'Beng', 'native' => 'বাংলা', 'regional' => 'bn_BD'],

খুজে বের করুন এবং কমেন্ট  উঠিয়ে দিন, এবং স্পানিশ “es” লাইন টা কমেন্ট করে দিন

'bn' => ['name' => 'Bengali', 'script' => 'Beng', 'native' => 'বাংলা', 'regional' => 'bn_BD'],


Making the language selector

আমাদের ব্লেড ফাইল এ

<ul>
   @foreach(LaravelLocalization::getSupportedLocales() as $localeCode => $properties)
     <li>
         <a rel="alternate" hreflang="{{ $localeCode }}" href="{{ LaravelLocalization::getLocalizedURL($localeCode, null, [], true) }}">
         {{ $properties['native'] }}
         </a>
     </li>
   @endforeach
 </ul>

এতে ভাষা পরিবর্তন করার লিঙ্ক তৈরি হবে। আমাদের এখন একটা middleware বানাতে হবে যা এই লিঙ্ক এ ক্লিক করলে ভাষা পরিবর্তন করতে পারবে

app/http/kernel.php এই ফাইল এ $routeMiddleware array টাতে কয়টা লাইন যোগ করুন

'localize' => \Mcamara\LaravelLocalization\Middleware\LaravelLocalizationRoutes::class, 
'localizationRedirect' => \Mcamara\LaravelLocalization\Middleware\LaravelLocalizationRedirectFilter::class,
'localeSessionRedirect' => \Mcamara\LaravelLocalization\Middleware\LocaleSessionRedirect::class,
'localeViewPath' => \Mcamara\LaravelLocalization\Middleware\LaravelLocalizationViewPath::class

এবার আপনার route ফাইল এ একটা route group তৈরি করুন


Route::group([
 'prefix' => LaravelLocalization::setLocale(),
 'middleware' => [ 'localeSessionRedirect', 'localizationRedirect', 'localeViewPath' ]
 ], function() {

    /** ADD ALL LOCALIZED ROUTES INSIDE THIS GROUP * */
     Route::get('/', function () {
        return view('welcome');
     });
     
     Route::get('/translated', function () {
        return view('translated');
     });

});

Route::get('/other', function () {
    return view('other');
});

এখন এই route groupএর মধ্যে যে সকল route declare করা হয়েছে সেগুলে লারাভেল ভাষা পরিবর্তন করবে।

আর বাইরের গুলোকে করবে না। আপনার form submit, ajax, post requests, গুলোকে এখানে রাখতে পাড়বেন

Lets Test

টেস্ট করার জন্য আমি আরও কিছু পেইজ বানিয়ে নিলাম কিছু বিষয় দেখবার

আমি একবার বাংলায় switch করলে সে আমাকে যে দুটো পেজ route group এর ভেতর সেগুলো বাংলায় দেখায় এভাবে আবার english switch করলে আমার সাইট এর যে সমস্ত লিঙ্ক route group এর ভেতর ওগুলে english এ দেখাবে এবং লিঙ্ক এর মাঝে /en অথবা /bn দেখাবে

আর যে লিঙ্ক আমাদের route group এর বইরে তার কোন পরিবর্তন হবে না

27mv85

Download

পুরে প্রোজেক্ট টা ডাউনলোড করুন এখানে

multilang.zip


DIY hot knife

I bought some plastic boards from New market last weekend. I say plastic board cause thats the only name the shop keeper could tell me. I think its a closed cell polyethylene board. I am probably wrong. but the properties are similar. Its hard, its relatively light but approximately 10 times heavier than Styrofoam and does not bend. It breaks before deforming.

2015-02-25 13.48.12
Plastic Board. Source: ABC Stationary New Market, Dhaka


They are pretty strong but i was able to make a clean cut with a Utility knife just as the shop keeper told me. But it takes a lot of patience and skill to make a clean cut and large shapes are just that difficult to pull off.

2015-02-25 13.48.59
Recommended cutting tools by shop keeper


As always the lazy mind has a tendency to look for easier ways. And I came across “heated knife” the tool used to cut this type of materials with ease. I tested the concept by heating some Utility Knife blades using fire and it worked.

Unfortunately i dont have a heated knife lying around. Googling around looking at how it works I thought it would be relatively easy to make one using a soldering iron.

I have this pretty “old” soldering iron with wooden handle and large tip. Since I have a spare i decided to make a knife out of it.

2015-02-25 11.40.32
Flattened Soldering Tip with some sanding to sharpen the edges.
2015-02-25 11.39.44
How thin it is from the side


The method I used is simple. I heated the soldering iron tip high and then hammered it to make a flat shaped head.

Once I was satisfied with the hammering a little sanding gave the edges some sharpness.

CAUTION: Using hot knife to cut plastic will release hazardous fumes. Try not to breath on them.

I tested the knife on a piece of board.

2015-02-25 11.32.47
Hand cut plastic board using home made hot knife


Although it wasnt like cutting butter. But it was definitely close to cutting vegetables 🙂 . I managed to cut a square board with smooth edges in less than a minute. It takes a while to get the tip heated. And perhaps due to its extended surface it looses heat faster and needs a break after cutting a while.

The edges are relatively smooth as well. You can make the edges better by slicing off the extra melted drops of plastic with a knife.

2015-02-25 11.33.09
Rough margins but smooth ends.

I am pretty impressed by the results, I will surely use this new plastic board for my future prototypes. I cant wait for the weekend to get around. 😉 .


DIY Thermo Electric Air Cooler

I made this thermoelectric air cooler a while back, almost forgot about them. I was clearing out my smartphones memory and found some image. So decided to post the idea here.

Things you need:

1 peltier device (Thermo electric cooler) I got this from china courtesy of a friend Bijoy
http://www.aliexpress.com/wholesale?SearchText=thermo+electric+cooler&opensearch=true

2015-02-25 12.23.20


2 CPU AMD cooler (any square shaped model but both same size preferred) I am not sure what model I used I just went to elephant road and got the cheapest available. Costs 100tk each From Elephant road. I bought 3

amd_3200_top


Heat sink compound. Found elephant road as well not sure about price 10tk per pack i guess. Also you get some compound free wit the CPU heat sinks.

Voltage source. I am using CPU power supply Any old atx power supply will do.

ATX-powersupply


Some thin wire to bind the coolers
Apply some heat sink compound to the peltier and place it on 1 of the heat sink.

Apply more compound and put the other cpu cooler on top.

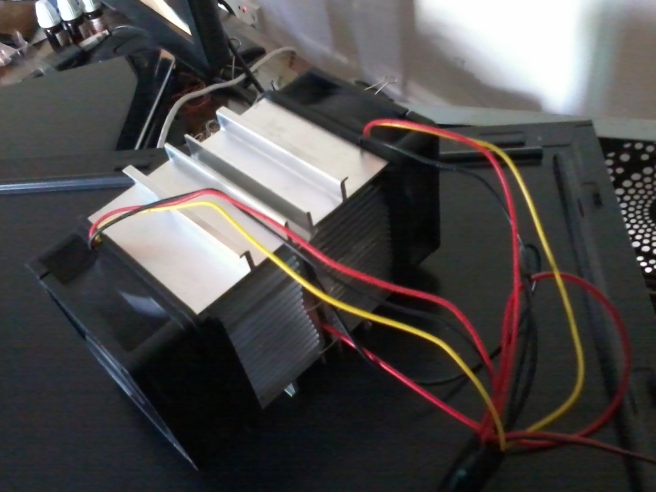
Make sure both cooler has the same orientation. The aluminium fins must be horizontal to each other.

It should look something like this-

2014-09-28 09.36.21

hold the 2 coolers on place tight and attach them using a thin wire rounding through the heat sink fins. Or if you can find appropriate nuts and bolts use them.

wire join


Yellow marks show wire joining the 2 heat sinks.

Connect the 3 red wires together, do the same for the black.

Red is 5v, black is ground and yellow is signal for CPU cooler. In my model the signal was optional so I didnt use them.

since we are connecting 3 in parallel same voltage will be maintained in 3.

If you have a power supply connection pin thats a good thing. otherwise just add the power and the ground to a power cable manually.

Same way ground is black in most power supply cables. and red is 5v.

The cooler was working good. I can feel the cold side getting cool in less than a minute. The heat generated on the other side is very high on the other hand.

you can use this cooler in a lot of applications. I was planning to use an array of these things to make asealed box computer casing( air conditioned) no dust but cool.

The cold air coming out of the heat sink is pretty soothing . Feels like putting your hand before an AC at 26*

The peltier looses its efficacy if the hot side is too hot. So the heat sink on the hot side is more important. And use of larger heat sink will increase overall performance.

I have seen a video on youtube someone making a box out of Styrofoam (Shola) and place this on the wall to make a mini freezer.

Feel free to comment your ideas.


JasperReport with java in Eclipse । ইক্লিপ্স এ জ্যাস্পার রিপোর্ট

জ্যাস্পার রিপোর্ট এর ওপর অনেক টিউটোরিয়াল আছে নেটে, আসলে এত বেশী পরিমানে আছে যে কোনটা দিয়ে আমি কাজ করেছিলাম তা নিজেই ভুলে যাব,

তাই ভুলে যাবার আগে পুরা প্রসেসটা আবার ভিডিও করে নিচ্ছি( অডিও নেই )। (বিঃ দ্রঃ ভিডিও অনেক বড় তাই আপ্লোড হচ্ছে না। )

প্রথমে যেগুলো ডাউনলোড করা লাগবে-

১) জেস্পাররিপোর্ট এ-পি-আই

http://jaist.dl.sourceforge.net/project/jasperreports/jasperreports/JasperReports%204.1.2/jasperreports-4.1.2-project.tar.gz

সোর্স ফোর্জ এর লিঙ্ক, ভেঙ্গে গেলে jasperreport দিয়ে সার্চ দিলেই হবে

২) রিপোর্ট ডিজাইনার

http://jaist.dl.sourceforge.net/project/ireport/iReport/iReport-4.1.1/iReport-4.1.1-windows-installer.exe

সোর্স ফোর্জ এর লিঙ্ক, ভেঙ্গে গেলে iReport দিয়ে সার্চ দিলেই হবে

৩) মাই এস কিউ এল+অ্যাপাচি (ওয়াম্প/জাম্প হলেও চলবে)

আমি এখনো জ্যাস্পার রিপোর্ট ডাটাবেসছারা কাজ করাতে পারি নাই। ডাটা বেস এর ব্যাবহার ছারা করা গেলে আপডেট জানাবো।

৪) মাই এস কিউ এল জাভা কানেক্টর

mysql-connector-java-5.1.15-bin.jar

এখানে পাওয়া যাবে-

http://www.mysql.com/downloads/connector/j/

৫) জাভা আই ডি ই এক্লিপ্স, আমি eclipse indigo for JEE ব্যাবহার করছি।

এবার কাজ শুরু

১) একটা নতুন জাভা প্রজেক্ট তৈরী করি এবং এতে এক্সটার্নাল জার ফাইল গুলো ইনক্লুড করি,

Project properties -> java build path -> libraries -> add external JAR

এখানে অ্যাড করতে হবে

mysql-connector-java-5.1.15-bin.jar

jasperreports-4.1.2\dist\jasperreports-4.1.2.jar

jasperreports-4.1.2\lib\* ( এই ফল্ডার এর সব জার)

২) একটি ছোট ডেটাবেস তৈরী করি jasper নামে, ইউজার নেম + পাসওয়ার্ড jasper

CREATE TABLE IF NOT EXISTS `test` (

`ID` int(11) NOT NULL,

`NAME` varchar(10) NOT NULL,

PRIMARY KEY (`ID`)

) ENGINE=InnoDB DEFAULT CHARSET=latin1;

— Dumping data for table `test`

INSERT INTO `test` (`ID`, `NAME`) VALUES

(1, ‘SHABAB’),

(2, ‘ANAS’),

(3, ‘SHAKIL’);

৩) ডাটা হলো এবার রিপোর্ট, আমাদের ডাউনলোড করা iReport ইন্সটল করে তা দিয়ে রিপোর্ট বানাই, রিপোর্ট ডিজাইন এ খুব ডিটেইল গেলাম না, iReport4 ব্যাবহার করলে খুব সহজেই রিপোর্ট করা যায় wizard দিয়ে।

এই স্টেপ ৩ টি পার করতে সাহাজ্য করবে wizard। এর পর

n  প্রথম স্টেপ (ইন শর্ট)

n  দ্দিতীয় স্টেপ,

Create new report -> blank A4 -> launch report wizard

রিপোর্ট এর নাম দিয়ে নেক্সট দিন

Query ফিল্ড এ

SELECT * FROM TEST

দিয়ে নেক্সট

সব গুলো ফিল্ড >> ডানে এনে নেক্সট নেক্সট ফিনিশ

Palette থেকে static text আর text field এনে এরুপ একটি রিপোর্ট তৈরী করি

এবার একটি প্যারামিটার আনবো যা আমাদের জাভা প্রগ্রাম থেকে আসবে

Parameters -> add parameter

নতুন parameter এর নাম দেই ID_PARAM

Project->edit query

থেকে আমাদের query condition এ প্যারামিটার যোগ করি

সব শেষে preview দেখে .jasper file তৈরী করি। সব ঠিক ঠাক চল্লে preview করলে একটি পপ আপ এসে ID_PARAM এর ভ্যালু চাইবে, এখানে 1 ইনপুট দিলে

Database থেকে ১ id এর ইনফো দেখাবে।

Preview সফল হলে একটি .jasper file একই ডিরেক্টরি তে তৈরী হবে এটাকে আমরা আমাদের জাভা প্রগ্রাম ফোল্ডার এ কপি করি। ধরা যাক ফাইলটার নাম “frmdatabase.jasper”

৪) এবার কোডিং, এখানে সবচেয়ে ছোট একটা এক্সাম্পল দেয়া হল, এটা একটা প্যারামিটার জ্যাস্পার কে পাঠায় যার উপর সে query করে কিছু রিপোর্ট করে

package jspertest;

import javax.swing.*;

import java.awt.*;

import java.sql.Connection;

import java.sql.DriverManager;

import java.util.*;

import net.sf.jasperreports.engine.*;

import net.sf.jasperreports.view.*;

public class MyReportViewer extends JFrame

{

public MyReportViewer(String fileName,Map parameter)

{

super(“View Report”);

try

{

Connection con = null;

try {

// Load the Oracle JDBC driver

Class.forName(“com.mysql.jdbc.Driver”).newInstance();

System.out.println(“MYSQL JDBC driver loaded ok.”);

} catch (Exception e) {

System.out.println(“Driver not found\n”);

System.err.println(“Exception: “+e.getMessage());

}

String username = “jasper”;

String password = “jasper”;

String dbname=”jasper”;

con =  (Connection) DriverManager.getConnection(

“jdbc:mysql://localhost:3306/”+dbname,username,password);

JasperPrint print = JasperFillManager.fillReport(fileName, parameter,con);

JRViewer viewer=new JRViewer(print);

Container c=getContentPane();

c.add(viewer);

}

catch(Exception e)

{

e.printStackTrace();

}

setBounds(10,10,600,500);

setDefaultCloseOperation(DISPOSE_ON_CLOSE);

}

public static void main(String args[])

{

Map param=new HashMap();

param.put(“ID_PARAM”,”2″);

MyReportViewer viewer=new MyReportViewer(“frmdatabase.jasper”,param);

viewer.setVisible(true);

}

}

এই প্রগ্রাম পাওয়া যাবে সোশাল অয়েব এ-

http://sw.daffodilvarsity.edu.bd/pg/file/shababhsiddique/read/72492/jasper-program

.jasper file টাও এর মধ্যে আছে

জাভা কোর্স ১ম – ৩য় দিন

জভা কোর্স এর সব গুলো প্রাক্টিস এখানে দেবার আশা  আছে। হয়তো পঠক দের কাজে আসবে

১ম দিন

http://sw.daffodilvarsity.edu.bd/pg/file/shababhsiddique/read/50040/java-course-warm-up-class-introduction-to-eclipse-ide

২য় দিন

http://sw.daffodilvarsity.edu.bd/pg/file/shababhsiddique/read/50052/java-course-warm-up-class-java-manners

৩য় দিন

http://sw.daffodilvarsity.edu.bd/pg/file/shababhsiddique/read/50037/java-course-warm-up-class-junit-test